 English

Views: 0 Author: Site Editor Publish Time: 2026-10-25 Origin: Site


Welding ultra-thin stainless steel presents a unique and frustrating challenge for modern fabricators. The material’s low thermal conductivity, combined with the intense energy density of a laser beam, makes thin sheets ranging from 16-gauge to 22-gauge highly susceptible to severe distortion and instant burn-through. Manufacturers aggressively market handheld laser equipment as being four to ten times faster than traditional TIG welding. However, achieving these impressive speeds on delicate materials without destroying the workpiece requires precise parameter control and strict operational discipline. You cannot simply point the torch and shoot expecting flawless results on 1.5mm gauges. This comprehensive guide breaks down the exact machine parameters, joint preparation standards, and operational techniques required for success. You will learn how to properly configure your equipment to weld thin stainless steel flawlessly. By applying these methods, you protect both structural integrity and cosmetic aesthetics in your final assemblies.
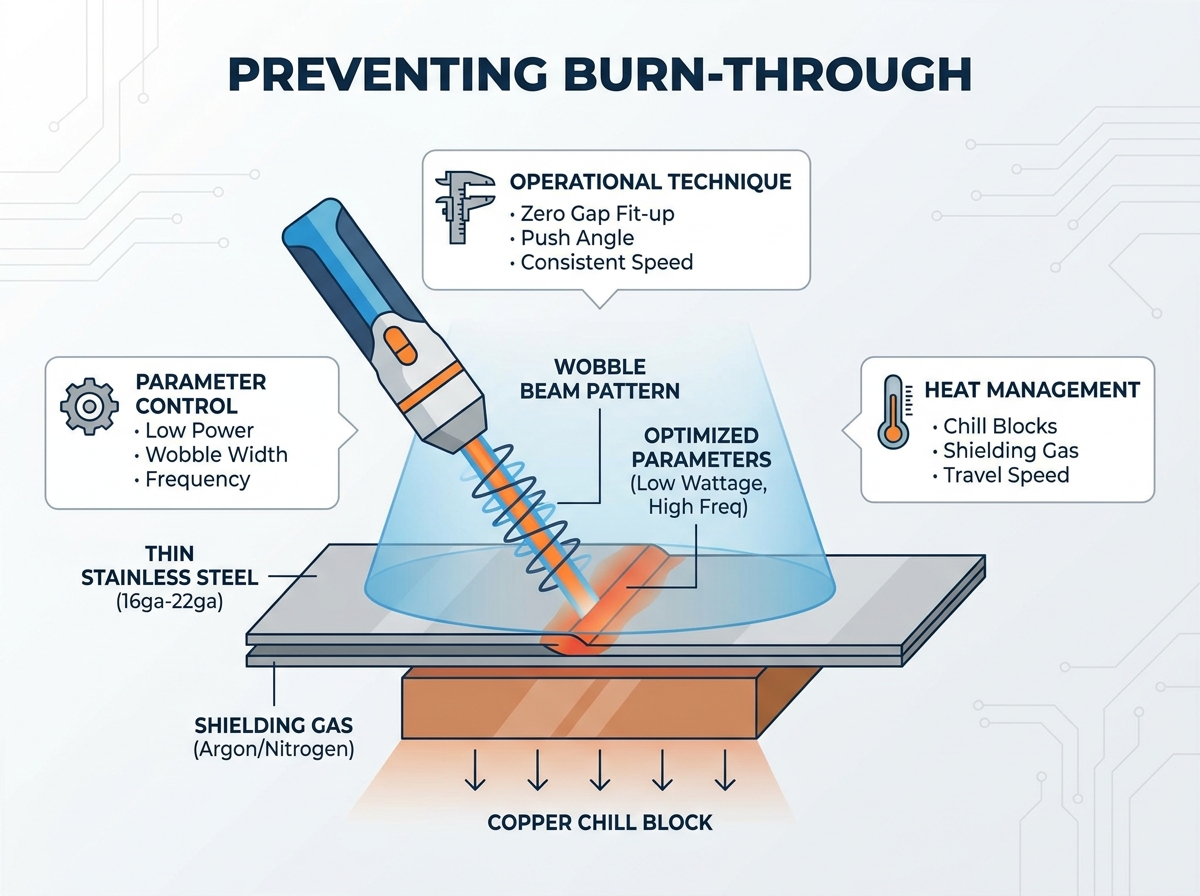
Fit-up is non-negotiable: Autogenous laser welding on thin stainless requires near-zero gap tolerances; the laser will blow through rather than bridge poorly fitted joints.
Parameter optimization: Preventing burn-through relies on balancing low-wattage power delivery with optimized wobble frequency and travel speed.
Heat management: Utilizing copper chill blocks and appropriate shielding gas (Argon or Nitrogen) is critical for managing the heat-affected zone (HAZ) in materials under 1.5mm.
Equipment selection: Not all handheld lasers are equal; successful thin-metal welding requires machines with stable power output at low ranges and highly adjustable beam modulation (wobble) settings.
Stainless steel behaves uniquely under a laser beam compared to carbon steel or aluminum alloys. It possesses notably poor thermal conductivity. When the intense laser photon stream hits the surface, the metal retains heat locally rather than dispersing it rapidly through the surrounding structure. This localized heat creates a highly concentrated, fluid melt pool. In thicker base metals, the surrounding mass safely absorbs this intense heat gradient. However, in thin sheets measuring under 1.5mm, this concentrated thermal energy quickly overcomes the structural integrity of the metal. The molten puddle simply drops out of the joint, creating a catastrophic hole.
The relationship between energy density and material thickness dictates your success rate. Continuous wave (CW) lasers deliver an uninterrupted stream of high-intensity energy. When processing 16-gauge or thinner materials, CW energy easily exceeds the material's physical threshold to support the molten puddle. You must actively manage this energy density. If you fail to dissipate or modulate the heat, the laser essentially becomes a cutting tool rather than a precise welding instrument.
Burn-through carries heavy business consequences for any fabrication shop. It immediately generates high rework costs and forces you to scrap high-value parts. Operators must spend hours on tedious post-weld grinding to fix blowouts and restore surface finish. Furthermore, excessive heat accumulation destroys the material's inherent corrosion resistance. Overheated stainless steel precipitates chromium carbides, rendering the metal susceptible to rust and effectively useless in sterile, food-grade, or marine environments.
Dialing in correct handheld laser welder thin metal settings serves as the absolute foundation for success. You must manipulate power output, wobble patterns, and focal depth to create a forgiving, wide energy profile.
Always start at the lowest viable power setting for your specific gauge. For 16-gauge to 22-gauge stainless sheets, operators often find the optimal zone between 150W and 300W. Your manual travel speed directly dictates the required wattage. Moving slightly faster allows a marginally higher power setting, but leaves little room for hesitation. If your laser system offers pulse modes or beam modulation, use them immediately. Pulsing enables brief, microsecond cooling cycles between active energy deliveries. This stops runaway heat accumulation. The puddle freezes just enough between pulses to support its own weight, keeping the molten material manageable and secure.
A wobble head oscillates the internal optics to move the laser beam rapidly. This mechanical action artificially widens the beam path on the workpiece. Instead of piercing a tiny, hyper-concentrated dot into the metal, the wobble mechanism distributes heat over a larger surface area. This fundamental action prevents localized piercing on delicate sheets. We recommend starting with a wider wobble pattern, typically measuring between 1.5mm and 2.5mm for thin materials. Pair this width with a high frequency ranging from 150Hz to 300Hz. High-frequency oscillation creates a smoother, broader puddle. A faster frequency ensures the beam does not dwell on any single micro-point long enough to cause a blowout.
Adjusting your focal position provides an extra layer of thermal protection. Using a slightly positive defocus strategy softens the laser's aggressive energy profile. By manually moving the focal point slightly above the workpiece surface, you widen the overall beam footprint. This simple adjustment reduces direct penetration depth, making the process significantly safer for ultra-thin gauges.
Suggested Parameter Baselines for Thin Stainless Steel
Material Gauge | Thickness (mm) | Suggested Power Range | Wobble Width | Wobble Frequency |
|---|---|---|---|---|
16 GA | 1.52 mm | 250W - 350W | 1.5 mm - 2.0 mm | 150 Hz - 200 Hz |
18 GA | 1.21 mm | 200W - 250W | 1.8 mm - 2.2 mm | 200 Hz - 250 Hz |
20 GA | 0.91 mm | 150W - 200W | 2.0 mm - 2.5 mm | 250 Hz - 300 Hz |
22 GA | 0.76 mm | 100W - 150W | 2.0 mm - 2.5 mm | 280 Hz - 300 Hz |
Mastering machine settings only solves half the equation in your shop. Operator technique ultimately dictates the final structural outcome. You must adapt your physical movements and part preparation methods to effectively stop laser welding thin sheet burn through.
The most significant operator learning curve centers entirely on travel speed. Moving the torch too slowly instantly over-saturates the delicate joint with heat, causing immediate burn-through. Conversely, moving too quickly across the seam results in ugly skip-welds or a complete lack of fusion. Maintaining a steady, rhythmic feed rate is absolutely essential for thin metals. We highly recommend using physical bracing techniques or rolling guide nozzles. These simple mechanical tools help operators maintain a consistent focal distance while ensuring steady movement across the joint length.
Your torch angle heavily influences both heat distribution and gas coverage. Advise all operators to utilize a deliberate push angle. Typically, holding the torch at 45 to 70 degrees relative to the workpiece yields the best results. A push angle ensures your shielding gas coverage always leads the molten puddle, protecting the virgin metal from oxidation before the laser hits it. Furthermore, pushing directs excess heat away from the trailing edge of the weld, minimizing thermal accumulation behind the puddle.
Many experienced operators carry over bad habits from traditional TIG welding. Using thick filler metal to bridge wide gaps does not translate well to laser technology. For thin sheets, gaps must be virtually eliminated before you ever pull the trigger. They should ideally measure less than 10% of the base material thickness. Frequent, low-heat micro-tacks are vital. Intense thermal distortion can easily open gaps ahead of your weld path as you progress down the seam. Tacking the joint closely prevents the sheet metal from warping, buckling, and separating.
Clean all joint edges thoroughly to remove oils and oxides before fitting.
Clamp the entire length of the seam securely using heavy fixturing.
Place low-power micro-tacks every one to two inches along the joint line.
Inspect the fit-up visually before running the continuous root bead.
Managing the thermal environment around the joint requires external aids beyond the laser itself. Optimized shielding gas and physical heat sinks offer massive advantages when processing 16-gauge to 22-gauge stainless assemblies.
Pure Argon remains the reliable industry standard for shielding. It provides excellent puddle coverage, ensures a highly stable plasma plume, and consistently yields a bright, cosmetically pleasing finish. Nitrogen serves as a highly effective, and sometimes superior, alternative. It often produces a slightly cooler puddle compared to Argon. Furthermore, Nitrogen can actually enhance the mechanical strength and pitting corrosion resistance of specific austenitic stainless alloys, such as 304 and 316. Proper gas flow rates matter immensely in thin sheet applications. Typical flow rates range between 20 to 35 CFH (Cubic Feet per Hour). If the flow is too high, it creates violent turbulence. This turbulence actively pulls atmospheric oxygen into the puddle, causing contamination. If the flow is too low, the gas fails to cool the surface adequately, leading to severe sugaring and destructive oxidation.
You should employ mechanical heat sinking techniques whenever physically possible. Clamping copper backing bars or heavy chill blocks tightly behind the weld joint works wonders. Copper acts as an incredibly aggressive thermal sponge. It rapidly pulls excess heat out of the stainless steel structure before the molten puddle can drop through the gap. This simple physical addition drastically widens your parameter operating window, making the process much more forgiving for the operator.
Your core equipment determines your baseline production capability. When executing handheld laser welding thin stainless steel at scale, you will quickly realize not all machines perform equally well. Selecting the right power source is critical.
Beware of budget laser systems flooding the market. Many of these machines suffer from severe power fluctuations when dialed down to low wattages. To handle delicate 18-gauge or 20-gauge stainless, a machine must deliver completely consistent, stable energy at just 10% to 20% of its maximum capacity. Sudden spikes in power at these low levels will instantly ruin thin parts and skyrocket your scrap rate.
Modern fabricators need intuitive, reliable software interfaces. Look for systems offering customizable, material-specific memory presets. Operators must be able to recall proven settings instantly—such as loading a specific program for a "16ga Stainless Outside Corner." This guarantees repeatable quality across multiple shifts and maintains your desired production scale without constant manual tweaking.
Assess whether the laser system features a fully synchronized wire feeder mechanism. Autogenous (no filler) welding remains the strongly preferred method for thin sheets, as it minimizes overall heat input. However, a highly calibrated, fine-wire feeder running 0.8mm wire helps mitigate minor fit-up imperfections. It allows you to bridge slight gaps without pumping excessive heat into the delicate base metal.
Handheld laser systems are classified as Class 4 laser devices. They present serious, permanent optical hazards in a fabrication environment if used improperly. Ensure your chosen equipment fully meets local regulatory standards, such as strict FDA/CDRH requirements in the United States or comprehensive CE compliance in Europe. Light-tight enclosures, interlock systems, and proper protective eyewear are absolutely mandatory for safe operation.
Successfully preventing burn-through on thin stainless steel hinges on strict operational control and proper physics management. You must combine meticulous joint preparation with optimized machine parameters and highly stable equipment.
Control your fit-up tightly: Eliminate gaps to prevent the highly focused beam from piercing the seam.
Dial in the heat profile: Use wide wobble patterns, high oscillation frequencies, and low-wattage stability to manage the fragile puddle.
Leverage external heat sinks: Utilize copper backing bars and appropriate shielding gas to restrict the heat-affected zone actively.
Standardize operator movements: Train your staff to maintain consistent travel speeds and employ correct push angles.
While modern laser technology drastically reduces your overall arc time, the upfront engineering secures your true operational success. Taking the time to perfect your tooling, test various parameters, and refine initial fit-ups guarantees flawless thin-sheet production. We highly encourage all readers to request a physical demonstration. Ask the manufacturer to perform sample welds on your specific stainless steel gauges before ever committing to a final equipment purchase.
A: A high-quality handheld laser can successfully weld stainless steel down to 0.5mm (24-gauge). Achieving this requires absolute precision. You must use copper chill blocks for heat sinking, apply near-perfect fit-up tolerances, and utilize a high-frequency wobble setting coupled with stable, low-wattage power output.
A: Autogenous laser welding cannot bridge wide gaps on thin metal; the concentrated beam simply falls through. However, using a synchronized wire feeder allows you to bridge very minor gaps. Keep in mind that adding wire increases the required heat input, subsequently raising the risk of burn-through.
A: This black oxidation, commonly known as "sugaring," happens when the back of the weld is exposed to atmospheric oxygen while severely hot. It primarily results from excessive heat input penetrating the full thickness of the sheet or failing to use an adequate inert gas back-purge.
A: While a modulated CW laser paired with an oscillating wobble head works exceptionally well for thin sheets, a true pulsed laser provides the highest level of control. Pulsing allows distinct micro-cooling cycles, drastically reducing total heat input and preventing burn-through on ultra-thin gauges.
